Cloud Chamber
The group has recently built a desktop diffusion cloud chamber that allows the paths of charged particles to be seen by the unaided eye.
It is built from inexpensive and readily available materials and is suitable for classroom demonstrations. In operation it consumes small quantities of dry ice (a couple of kg provides several hours of operation if care is taken with insulation) and small quantities of isopropanol (a few cc are enough for an hour of operation).
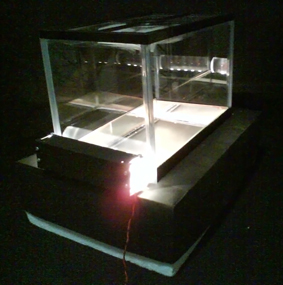
The chamber is made from a fish tank that can be purchased cheaply from a toy shop or pet shop. The open side of the tank is sealed with a closely-fitting thin metal plate. Before closing the tank with the plate, attach a paper tissue to the inside face opposite the plate and moisten the tissue with isopropanol. Now place the tank so that the metal plate is at the bottom and in contact with a layer of dry ice in an insulating container. Illuminate the region inside the tank, just above the metal plate, from the outside using a bright light source.
The assembled chamber can be seen in the photo. Note the use of black paper to reduce annoying reflections.
Principle of operation
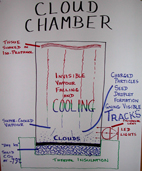
The principle of operation is illustrated in the sketch (click on it for a higher resolution version). Vapour falls from the isopropanol-soaked tissue towards the very cold metal plate. After a short while you should see a mist of isopropanol droplets just above the plate where the vapour is cold enough to condense. Just above this region the vapour is super-saturated - it would like to condense but there are no nucleation centres to seed the droplets. A charged particle travelling through the super-saturated layer can cause nucleation along its path by polarising the vapour molecules and this allows droplets to form along the paths of the particles and so make them visible.
You may find that your apparatus works straight away without problem. More likely, however, you will find that it may need a little optimisation. At the bottom of this page we provide some hints that you might find helpful.
For the impatient, here are a few movies (QuickTime). Movies 1 and 2 are without any radioactive source added (just natural background radiation). The lighting is not ideal in these and the tracks are a little indistinct but you may see a few traces. For the second two movies we inserted a radioactive source (actually a thoriated welding rod) vertically into the cloud chamber. You can see the tip protruding from the bottom of a metal sheath. Thorium is an α-source (see below) and the α-particles produce quite bright traces. Two or three should be visible in each of movies 3 and 4.
Movies 5 and 6 are of particle trails in a commercially available cloud chamber by the company PHYWE. The physics department has one of these in the Cavendish museum area.
- 01/03/2010
- Movie 1 (.mp4,1MB) - No added source, viewed towards light.
- 01/03/2010
- Movie 2 (.mp4,1MB) - No added source, viewed towards light.
- 02/03/2010
- Movie 3 (.mp4,3MB) - Thorium source, viewed towards light.
- 02/03/2010
- Movie 4 (.mp4,3MB) - Thorium source, angled view.
- 22/06/2016
- Movie 5 (.mp4, 100MB) - The PHYWE cloud chamber.
- 22/06/2012
- Movie 6 (.mp4, 160MB) - The PHYWE cloud chamber.
A few words on what you can see
So, after a couple of minutes to allow the conditions inside the chamber to stabilise, you should begin to see filament-like trails of droplets of various lengths. Some will be straight, some irregular, some clear and bright and others more tenuous.
Most of the droplet trails are caused by particles produced in the radioactive decay of naturally occuring elements. These are classified as α-decays, β-decays and γ-decays. α-decays produce α-particles (they are the same as the nuclei of Helium atoms), β-decays emit electrons (and neutrinos, but these are not detected by the cloud chamber) and γ-decays emit high energy photons known as γ-rays (they are also not detected).
α-particles lose their energy very quickly and stop after travelling a few centimetres in air and are easily stopped by a piece of paper. Therefore, only α-particles produced inside the cloud chamber will be visible and they will typically produce a short, but usually bright, trail of droplets.
Electrons lose their energy more slowly but the ones produced in natural radiation are unlikely to be able to penetrate through the walls of the tank. Therefore these too can only be seen if they are produced inside the chamber but they may travel much further and produce trails that span the entire width or length of the chamber.
γ-rays are neutral particles and do not polarise the vapour so they are not observed except in the rare case that they interact with an atomic nucleus. Even then, the products of the interaction may not travel far enough to be seen.
It may also be possible to see droplet trails caused by particles known as muons that are generated when high energy cosmic rays strike the top of the Earth's atmosphere. They tend to be mostly travelling vertically downwards so only leave short trails because the super-saturated vapour layer is not very deep.
Hints on the cloud chamber design
- The vertical height of the chamber affects the temperature gradient and therefore the thickness of the super-saturated layer. Our tank is about 25cm high.
- The metal plate should not be larger than necessary and no part of it should be exposed to ambient temperature as it will be very hard then to make it cool enough. Our plate is a snug fit to the tank and the whole lower part of the tank is inserted into a home-made insulating (expanded polystyrene) container that both holds the layer of dry ice and provides insulation around the lower part of the chamber. This should also be a snug fit to avoid wasting dry ice.
- A layer of foam rubber underneath the dry ice may help to level it out so that there is better thermal contact with the metal plate. When first placed in contact with the dry ice and pressed down you might hear a squealing/hissing noise as the carbon-dioxide gas tries to escape through small holes.
- The chamber should not be completely airtight to allow the internal pressure to equalise with atmospheric pressure while the chamber is cooling. However, draughts caused by air leaking inside around the metal plate should be avoided as this makes it harder to keep the plate cold and also may cause turbulence. We use a rubber gasket to seal between the metal plate and the tank but we drilled a small hole through the glass of the opposite face using a diamond drill (take care!). This also allows us to replenish the isopropanol without dismantling the chamber.
- Keep the metal plate horizontal.
- Try to avoid reflections that make it hard to see inside. We painted the inside surface of the metal plate black. Operate the chamber in a darkened room and use black paper if necessary to try to reduce reflections.
- Use a bright light source. A fluorescent desk lamp will do but we used bright white LED lights and a lens to produce an approximately parallel and horizontal beam.
- You will certainly need to play with the position of the light source to get the best effect. We positioned our lamp along one side of the tank and about a quarter of the way up from the bottom. The beam should be roughly horizontal but you may need to adjust the angle and also mask light that isn't going where you want it.
Cloud Chamber Calendar and Bookings
When not "on tour" our PHYWE cloud chamber is on permanent display in the Cavendish Museum area.
Future events highlighted in green.
| Date | Event |
|---|

