Shipment Reports
There are two sections under the Shipments tab:
Create a New Shipment
This is a useful utility to register a shipment of any number items from any institute to another institute.
To see how it works, check out the example.
View Existing Shipments
Comprehensive reporting of shipments between SCT institutes/manufacturers etc.
Example 1: How to register a shipment of components from one institute to another
In this example, I will register the shipment of all barrel detectors from serial number 20220900211000 to 20220900212000 that are at Cambridge, to RAL.
NOTE: In this example, there are only 241 detectors at Cambridge between these serial numbers, as you will see below:
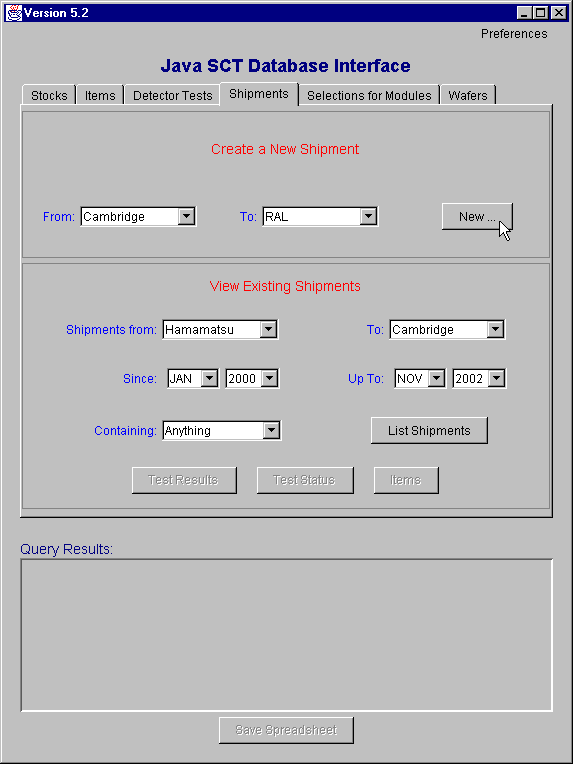
- Select 'Shipments' tab (see below)
- In 'Create a New Shipment' section, select From 'Cambridge'
- Select To 'RAL'
- click on 'New ...'
- A new window appears (see below)
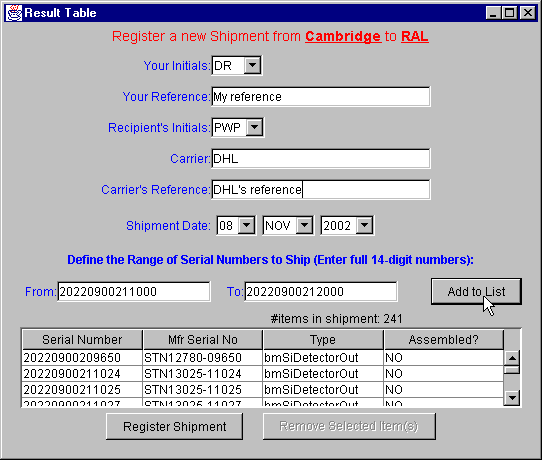
- Select your initials (NB only people registered at the sending institute are listed!)
- Enter any reference for this shipment
- Select the initals of the recipient (NB only people at the receiving institute are listed!)
- Enter the carrier name
- Enter the carrier's reference, if any
- Select the shipment date (NB by default this will be set to today's date)
- Enter the range of serial numbers, ie the s/n of the first device in you shipment, and the
s/n of the last device in your shipment
- Click on 'Add to List'
- The devices between your first s/n and you last s/n (including the first s/n and last s/n)
will be listed in the window, BUT only those that are owned by your institute (ie if the range of serial
numbers is not sequential, the missing s/n's will be missed out).
- Keep on adding devices to the list (ie repeat the above few steps) until you have
listed all the items you want to ship
- If you make a mistake you can remove any items from the list (ie items that you do NOT want to be
included in the shipment) by selecting the appropriate row(s) and click on the 'Remove Selected Items' button:
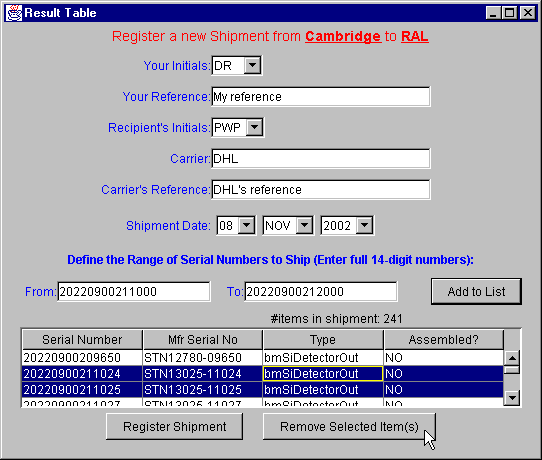
- Click on 'Register Shipment' when ready, and you will be asked to confirm, and enter your institute write-access username nad password
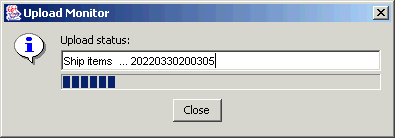
- A window opens to allow you to monitor progress of your upload:
- When the upload is finished, a web browser window will open automatically (provided you have set one in your
preferences!) with the Geneva database web interface form that you need to confirm your shipment.
To confirm your shipment, enter the shipment date in the 'Ship Confirm Date' field and then click 'Update'.
You must confirm your shipment using the Geneva database web interface form!
If you didn't set a web browser in your preferences, you will need to confirm the shipment
yourself from the Geneva web interface.
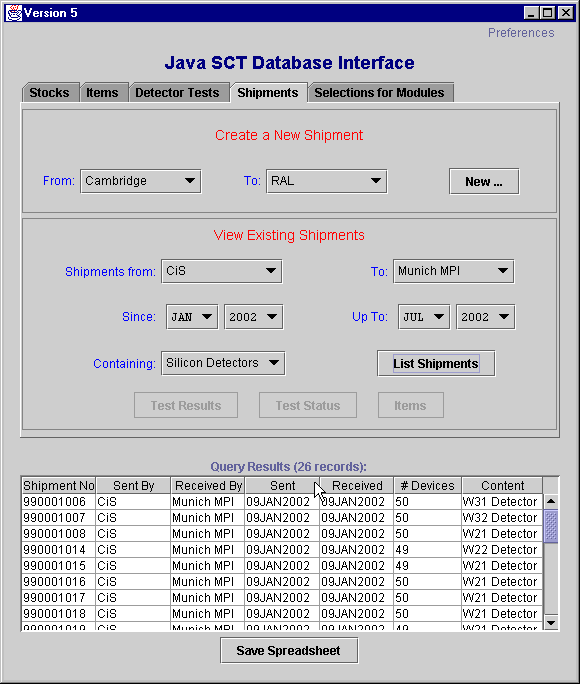
Example 2: How to view all shipments of Silicon Detectors from CiS to MPI during the year 2002
- Select the 'Shipments' Tab
- In 'View Existing Shipments', select the following:
- Shipments From: CiS
- To: Munich MPI
- Since: Jan 2002
- Up To : (leave as default, which is the current date when your run this)
- Containing: Silicon Detectors
- Click on 'List Shipments'
Example 3: How to list all items in a shipment, with their status
- Select the 'Shipments' Tab
- Generate a list of shipments, as described in Example 2 above.
- Select the shipment of interest (see below):
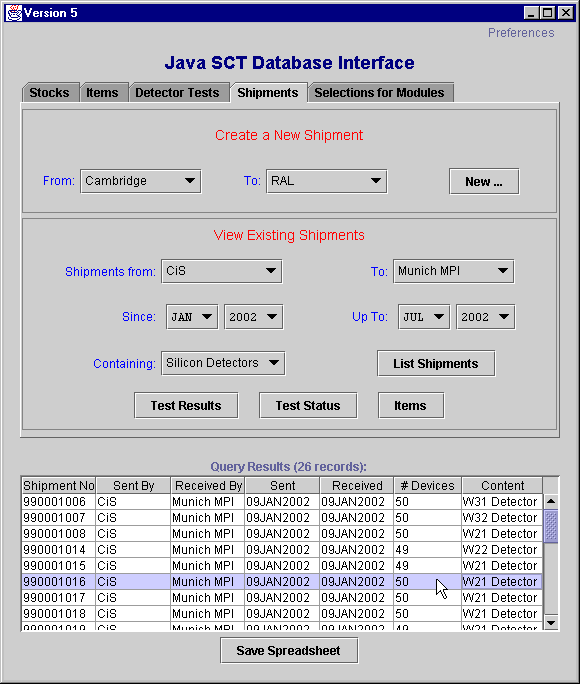
- Once the table row is selected, the buttons become active
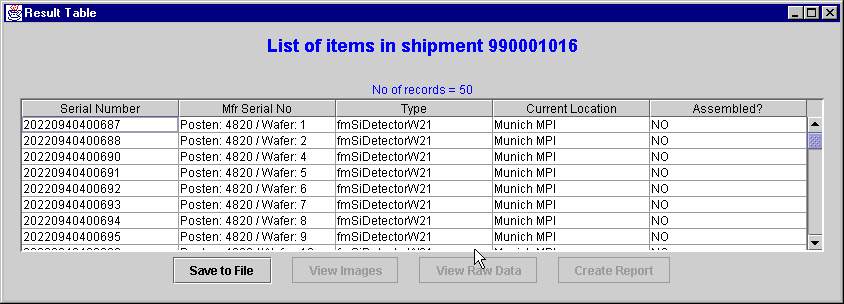
- Click on Items
- A new window appears, with all the items listed (see below):
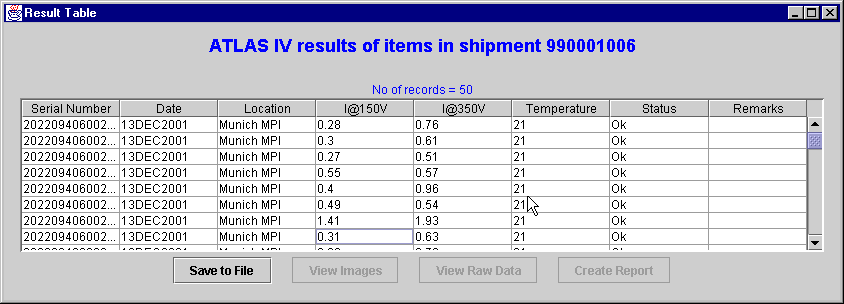
Example 4: How to view all test results of items in a shipment
- Select the 'Shipments' Tab
- Generate a list of shipments, as described in Example 2 above.
- Select the shipment of interest (see below):
- Once the table row is selected, the buttons become active
- Click on Test Results
- A new window appears, asking you what test data to list (see below):

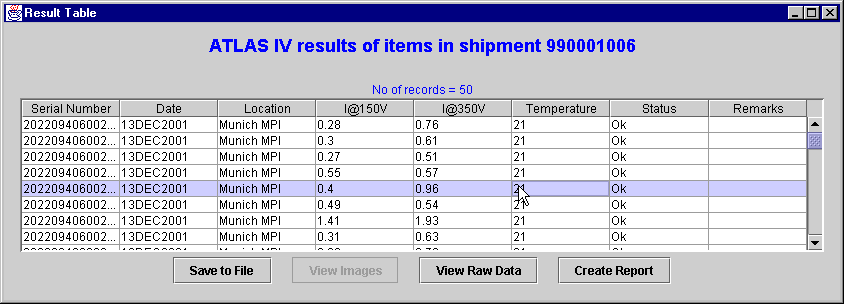
- For example, if you select 'IV' data, the IV data for all items in that shipment appears in a new window:
- To retrieve full test details of individual devices in a shipment, select the item row, and click the
appropriate button (which becomes enabled when a row is selected):
Example 2: How to receive a shipment
- Select the 'Shipments' Tab
- In 'View Existing Shipments', select the appropriate parameters, eg:
- Shipments From: CiS
- To: Munich MPI
- Since: Jan 2002
- Up To : (leave as default, which is the current date when your run this)
- Containing: Anything
- Click on 'List Shipments'
- Select the shipment which has not yet been received (It will have 'Not received' in the receive date) and click
on 'Receive Shipment'.
- A web browser window will open automatically (provided you have set one in your
preferences!) with the Geneva database web interface form that you need to confirm the receipt of your shipment.
Tick both checkboxes and click on 'Update'.
If you didn't set a web browser in your preferences, you will need to confirm the shipment
yourself from the Geneva web interface.

Back to Java GUI Guide